这是关于斯坦福大学的UFLDL(Unsupervised Feature Learning and Deep Learning)中CNN一章的笔记,用来补足Hinton神经网络公开课略过的部分。
概览
前几次练习解决了处理低分辨率图片的问题,比如小块儿的手写数字,这一章将学习如何将这些方法应用到大图片上去。
全连接网络
sparse autoencoder(课程后面会讲)的设计之一是从所有输入单元连接到所有隐藏单元。在小图片上这没有什么计算压力。但是在大点的图片上就够呛了,对于$10\times10$像素的图片,原始特征维度为$10^2$;如果要学习$100$个特征,则有 $10^4$ 个参数。在特征数固定的条件下,像素宽高每增加$10$倍,参数增加$10^2$倍。
局部连接网络
针对上述问题,一个简单的解决方案是限制输入层到隐藏层的连接数,允许每个隐藏单元只连接到一小部分输入单元。具体来讲,每个隐藏单元只连接到输入的一小块儿像素上(对音频来讲,是连续的一个片段)。
这种部分连接的思想也启发自生物学上视觉系统的发育过程,视觉皮层中的神经元只对特定区域的刺激有反应。
卷积
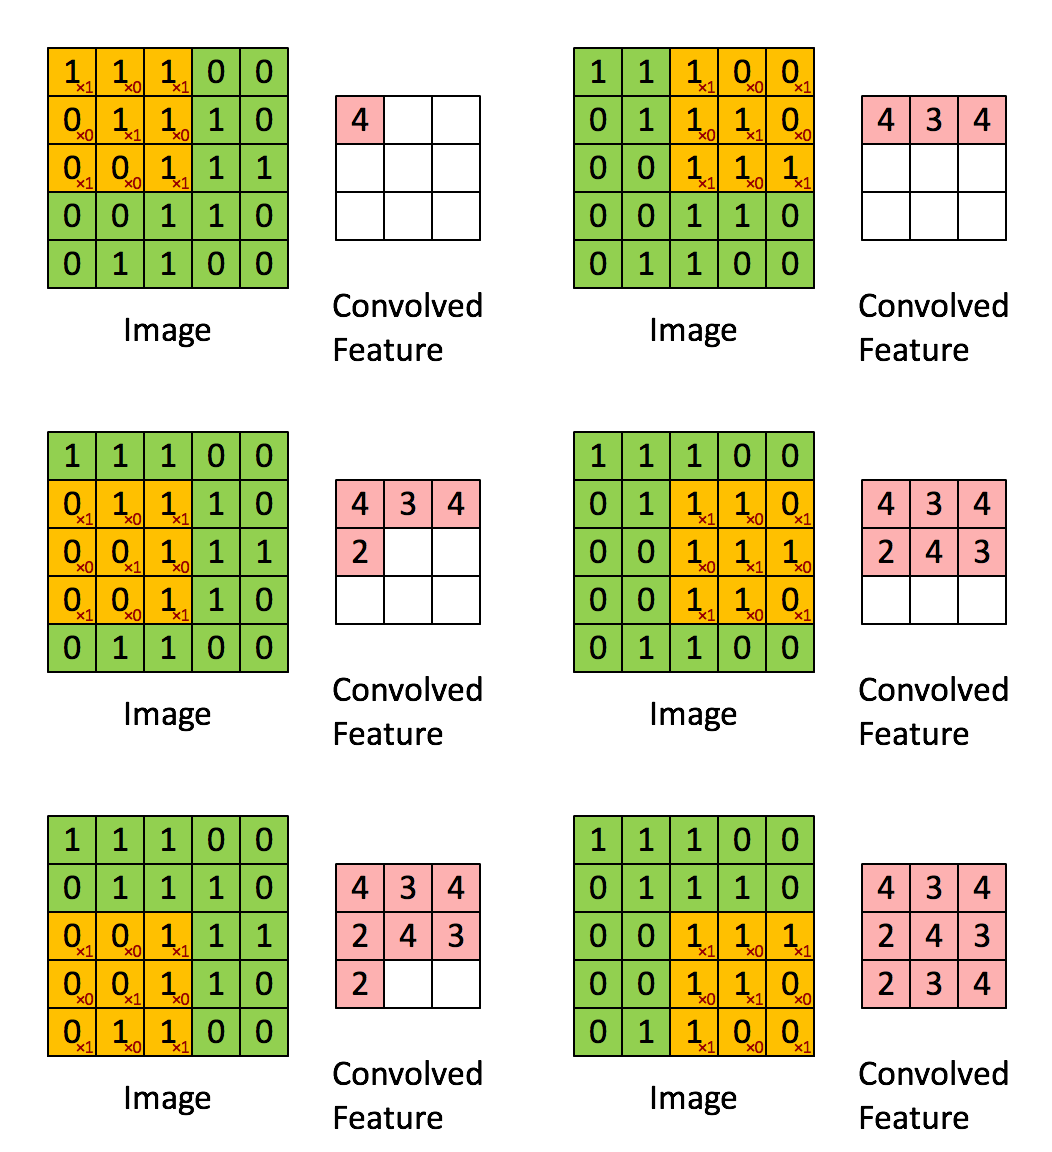
生活中的图片具有“不变性”,即图片中的一个部分与另一个部分经常是相同的。这启发我们在一个地方学习到的特征,应该能够应用到任何其他地方去。
更准确地讲,在高分辨率图片上的某个小区块(比如说$8 \times 8$的小图片)上学习到的特征detector(的权重)可以应用到任何地方去。可以通过将这些新特征与原始特征“卷”在一起的方式,得到更丰富的激活值。
举个例子,原始图片大小为 $96 \times 96$ ,对每个连续的 $8 \times 8$ 区块进行100种不同的特征学习(也就是100个不同的feature detector或说隐藏层单元),就能在以坐标$(1,1), (2,2), …(89,89)$开始的位置得到$89 \times 89$个卷积特征。这个89是怎么来的呢,宽高能容纳的小方块数都是$96-8+1=89$个。

上图虽然像素不是$96 \times 96$,但原理是一样的。
形式化地讲,给定分辨率大小为 $r \times c$ 的图像 $x_{large}$ ,首先对这些图像进行抽样,抽样出大小为 $a\times b$ 的区块 $x_{small}$ ,利用这些区块通过稀疏自动编码器来进行 $k$ 个特征的学习(这里特征的学习,即滤波器或神经元权重的学习。 $k$ 是卷积层神经元或滤波器的数目,也是该卷积层输出的通道数)。该学习过程受如下参数约束:从可见单元到隐含单元的权重 $W^{(1)}$ 和偏置 $b^{(1)}$。对从大图像抽样出的每个大小为 $a\times b$ 的区块 $x_{s}$ ,计算该区块的 $f_s = \sigma(W^{(1)}x_s + b^{(1)})$ ,将这一张大图上的所有区块计算完,就得到了这张大图的卷积特征 $f_{convolved}$,这个卷积特征是一个规模为 $k \times (r – a + 1) \times (c – b + 1)$ 的三维数组。
下一节将进一步介绍如何将这些特征“池化”到一起,以获得更好的分类特征。
池化:概述
有了卷积特征,下一步就是用来做分类。理论上,可以用提取到的所有特征训练一个诸如 $SoftMax$ 之类的分类器,但这样做计算开销会很大。试想每张图像的像素为 $96 \times 96$ ,假设已经在 $8 \times 8$ 像素大小的输入区块上学习了 $400$ 个特征。每个卷积操作将会产生 $(96-8+1)\times(96-8+1)=7921$ 个元素的feature map,因为有 $400$ 个特征,这样每个样本将会产生维度为 $89^2 \times 400=3,168,400$ 的向量。在超过三百多万的特征上训练分类器是很难处理的,这也容易导致分类器过拟合。
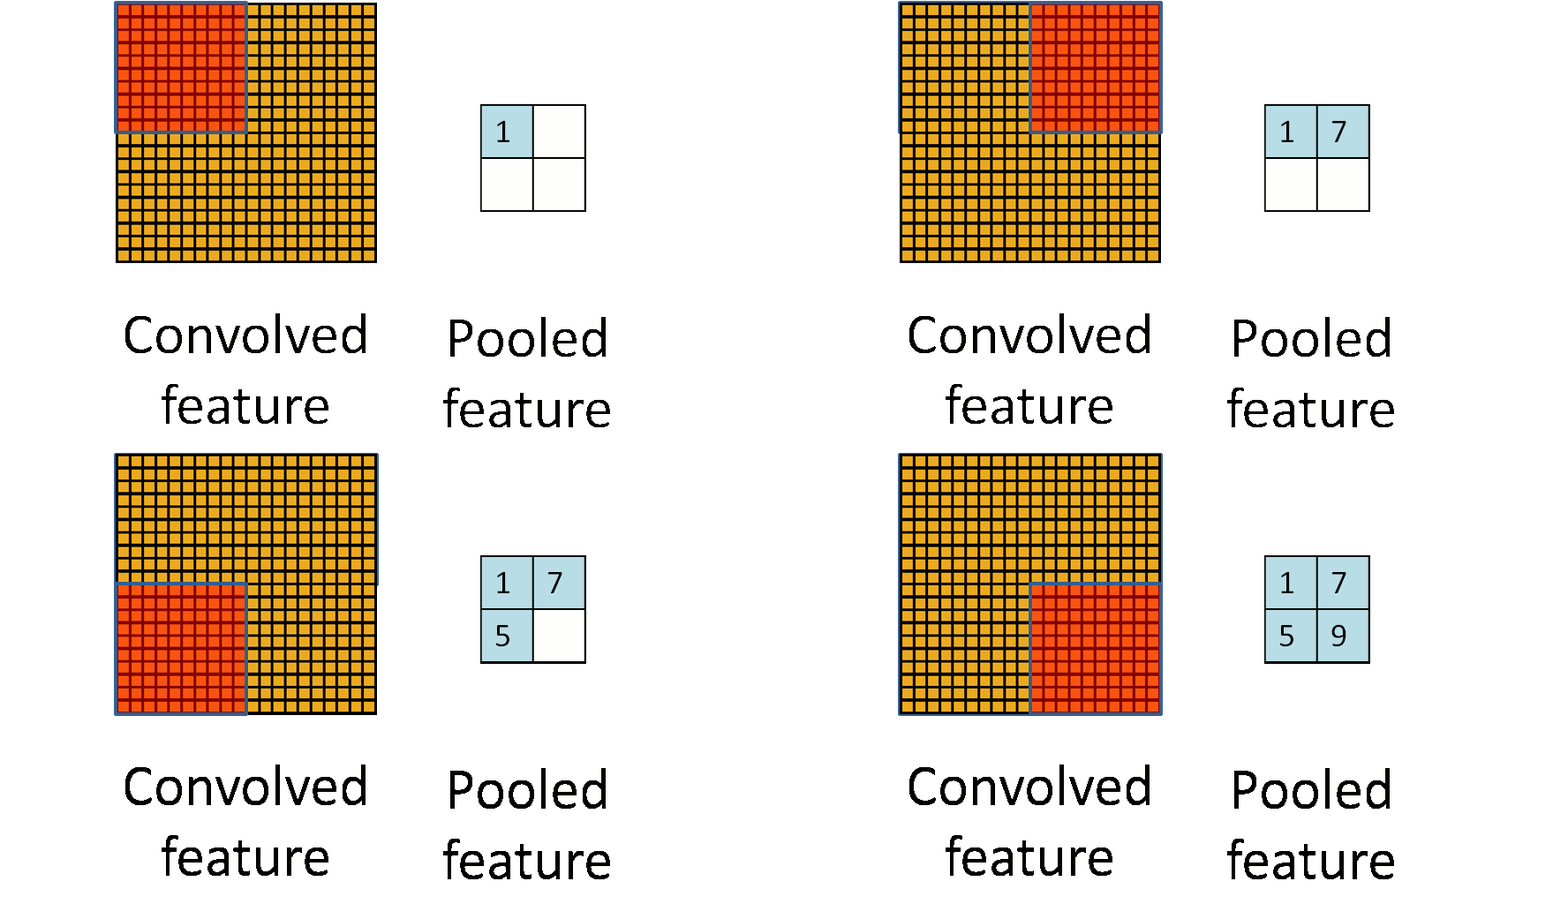
为了解决这个问题,首先回顾一下卷积特征的“固定不变”属性,不变性意味着在一个区域有效的特征也可能适用在其它区域。因此,要描述一个大图像,一个自然的方法是在不同位置处对特征进行汇总统计。例如,计算一个特定特征在图像中某一区域中的平均值(或最大值)。这样概括统计出来的数据,其规模就小得多,同时也可以改进分类结果(使模型不易过拟合)。这样的聚集操作称为“池化”,(根据具体的应用而选择池化方法)有时也称“平均池化”或“最大值池化”。
下面这幅图,展示了池化是如何在一幅图像上的 $4$ 个非重叠区域上进行的。

池化的不变性
如果在选择池化区域的时候是选择图像上的连续区域,以及来自相同隐含单元生成的池化特征,那么,这些池化单元将会是“变形稳定”的。这意味着即使有一些微小的变形,相同(被池化过的)特征也是激活状态。在很多任务中(例如,物体检测,语音识别等)变形稳定性是很重要的。即使图像变形了,但实际上仍然是同一个物体或类别。举个例子,如果你正使用 $MNIST$ 手写数字图片数据集,并左右平移数字,分类器应当仍能不受影响准确分类。
形式化的描述
形式化地描述,在获得了卷积特征后,就可以决定池化区域的大小了,比方说可以选择 $m \times n$ 的区域来对卷积特征进行池化。然后,将卷积特征分成每块 $m \times n$ 大小的不相交的区域块,并在这些区域块上对特征激活值应用平均(或最大)值,以获得池化特征。这些池化过的特征便可用在之后的分类上。
在下一节,将会进一步讲解如何将这些特征“池化”到一起,以得到更好的分类特征。
练习:卷积和池化
卷积和池化
在这次练习中,我们将测试卷积和池化函数。官方已经提供了了一些基础代码。我们只需在标记有“YOUR CODE HERE”的地方写自己的代码。在这次练习中,需要修改的文件是cnnConvolve.m 和 cnnPool.m。
参数与数据集
第0步定义了一些参数,加载了MNIST数据集。
%% STEP 0: Initialization and Load Data
%  Here we initialize some parameters used for the exercise.

imageDim = 28;         % image dimension

filterDim = 8;          % filter dimension
numFilters = 100;         % number of feature maps

numImages = 60000;    % number of images

poolDim = 3;          % dimension of pooling region

% Here we load MNIST training images
addpath ../common/;
images = loadMNISTImages('../common/train-images-idx3-ubyte');
images = reshape(images,imageDim,imageDim,numImages);

W = randn(filterDim,filterDim,numFilters);
b = rand(numFilters);
train-images-idx3-ubyte是一个字节类型的文件,包含了很多图片的二进制形式。用loadMNISTImages读进来后,是
>> size(dataset)

ans =

         784       60000
大小的浮点数数组,代表着60000幅28×28的图片。接着代码把它reshape成 的矩阵。
的矩阵。
实现和测试卷积
在这一步中,请实现cnnConvolve.m中的卷积函数,然后在一小部分数据上测试通过,以保证无误。实现卷积有难度,官方贴心地手把手提供了指导,只需在标有YOUR CODE HERE的地方写代码即可。
首先,对所有合法的$(r,c)$计算激活值$\sigma(Wx_{(r,c)} + b)$(合法指的是8*8的区块完全包含于图片中;另有一种full convolution允许区块超出图像范围并补零)。其中$x_{(r,c)}$指的是左上角位于$(r,c)$的8×8区块。
function convolvedFeatures = cnnConvolve(filterDim, numFilters, images, W, b)
%cnnConvolve Returns the convolution of the features given by W and b with
%the given images
%
% Parameters:
%  filterDim - filter (feature) dimension
%  numFilters - number of feature maps
%  images - large images to convolve with, matrix in the form
%           images(r, c, image number)
%  W, b - W, b for features from the sparse autoencoder
%         W is of shape (filterDim,filterDim,numFilters)
%         b is of shape (numFilters,1)
%
% Returns:
%  convolvedFeatures - matrix of convolved features in the form
%                      convolvedFeatures(imageRow, imageCol, featureNum, imageNum)

numImages = size(images, 3);
imageDim = size(images, 1);
convDim = imageDim - filterDim + 1;

convolvedFeatures = zeros(convDim, convDim, numFilters, numImages);

% Instructions:
%   Convolve every filter with every image here to produce the
%   (imageDim - filterDim + 1) x (imageDim - filterDim + 1) x numFeatures x numImages
%   matrix convolvedFeatures, such that
%   convolvedFeatures(imageRow, imageCol, featureNum, imageNum) is the
%   value of the convolved featureNum feature for the imageNum image over
%   the region (imageRow, imageCol) to (imageRow + filterDim - 1, imageCol + filterDim - 1)
%
% Expected running times:
%   Convolving with 100 images should take less than 30 seconds
%   Convolving with 5000 images should take around 2 minutes
%   (So to save time when testing, you should convolve with less images, as
%   described earlier)


for imageNum = 1:numImages
  for filterNum = 1:numFilters

    % convolution of image with feature matrix
    convolvedImage = zeros(convDim, convDim);

    % Obtain the feature (filterDim x filterDim) needed during the convolution

    %%% YOUR CODE HERE %%%
    filter = W(:,:,filterNum);

    % Flip the feature matrix because of the definition of convolution, as explained later
    filter = rot90(squeeze(filter),2);

    % Obtain the image
    im = squeeze(images(:, :, imageNum));

    % Convolve "filter" with "im", adding the result to convolvedImage
    % be sure to do a 'valid' convolution

    %%% YOUR CODE HERE %%%
    convolvedImage = convolvedImage + conv2(im, filter, 'valid');

    % Add the bias unit
    % Then, apply the sigmoid function to get the hidden activation

    %%% YOUR CODE HERE %%%

    convolvedImage = convolvedImage + b(filterNum);
    convolvedImage = sigmoid(convolvedImage);

    convolvedFeatures(:, :, filterNum, imageNum) = convolvedImage;
  end
end


end
这里filterDim是卷积核(或称过滤器)的横纵向维度。numFilters是feature map的个数。images是(r, c, image number)形式的三维数组。W和b是卷积核。参数给定之后,feature map的维度就固定了:
convDim = imageDim - filterDim + 1;
代码对每张图片应用numFilters不同次卷积,每次通过
filter = W(:,:,filterNum);
取出卷积核,squeeze去掉数组的单一维度,得到二维数据。为了适配matlab的conv2函数,需要预先旋转180度:
$$
\begin{pmatrix}
1 & 2 & 3 \\
4 & 5 & 6 \\
7 & 8 & 9 \\
\end{pmatrix}
\xrightarrow{flip}
\begin{pmatrix}
9 & 8 & 7 \\
6 & 5 & 4 \\
3 & 2 & 1 \\
\end{pmatrix}
$$
也就是要:
    % Flip the feature matrix because of the definition of convolution, as explained later
    filter = rot90(squeeze(filter),2);
于是就可以调函数了:
    % Obtain the image
    im = squeeze(images(:, :, imageNum));

    % Convolve "filter" with "im", adding the result to convolvedImage
    % be sure to do a 'valid' convolution

    %%% YOUR CODE HERE %%%
    convolvedImage = convolvedImage + conv2(im, filter, 'valid');
注释说要adding the result to convolvedImage,但实际上不需要,因为convolvedImage是0:
convolvedImage = conv2(im, filter, 'valid');
然后加上bias放到大数组里面去就行了:
    % Add the bias unit
    % Then, apply the sigmoid function to get the hidden activation

    %%% YOUR CODE HERE %%%

    convolvedImage = convolvedImage + b(filterNum);
    convolvedImage = sigmoid(convolvedImage);

    convolvedFeatures(:, :, filterNum, imageNum) = convolvedImage;
实现和测试池化
池化的代码位于cnnPool.m中的cnnPool函数。这里需要实现的是平均池化:
function pooledFeatures = cnnPool(poolDim, convolvedFeatures)
%cnnPool Pools the given convolved features
%
% Parameters:
%  poolDim - dimension of pooling region
%  convolvedFeatures - convolved features to pool (as given by cnnConvolve)
%                      convolvedFeatures(imageRow, imageCol, featureNum, imageNum)
%
% Returns:
%  pooledFeatures - matrix of pooled features in the form
%                   pooledFeatures(poolRow, poolCol, featureNum, imageNum)
%

numImages = size(convolvedFeatures, 4);
numFilters = size(convolvedFeatures, 3);
convolvedDim = size(convolvedFeatures, 1);

pooledFeatures = zeros(convolvedDim / poolDim, convolvedDim / poolDim, numFilters, numImages);

% Instructions:
%   Now pool the convolved features in regions of poolDim x poolDim,
%   to obtain the
%   (convolvedDim/poolDim) x (convolvedDim/poolDim) x numFeatures x numImages
%   matrix pooledFeatures, such that
%   pooledFeatures(poolRow, poolCol, featureNum, imageNum) is the
%   value of the featureNum feature for the imageNum image pooled over the
%   corresponding (poolRow, poolCol) pooling region.
%
%   Use mean pooling here.

%%% YOUR CODE HERE %%%
poolLen = floor(convolvedDim / poolDim);
rb = 0;
re = 0;
cb = 0;
ce = 0;

for i = 1 : numFilters
    for j = 1 : numImages
        for r = 1 : poolLen
            for c = 1 : poolLen
                rb = 1 + poolDim * (r-1);
                re = poolDim * r;
                cb = 1 + poolDim * (c-1);
                ce = poolDim * c;
                pooledFeatures(r, c, i, j) = mean(mean(convolvedFeatures( rb : re, cb : ce,i,j)));
            end
        end
    end
end
end
该函数接受的poolDim指的是池化前的feature map中每$poolDim\times poolDim$个元素将被池化为一个新元素,convolvedFeatures是上一步得到的卷积feature map。b和e分别代表行或列的起点和终点。第一次mean得到一个行向量,第二次mean得到一个标量,作为最终结果。
卷积和池化的测试脚本在cnnExercise.m中,运行后得到结果:
>> cnnExercise
Congratulations! Your convolution code passed the test.
Congratulations! Your pooling code passed the test.
 码农场
码农场