![]()
![]()
![]()
![]()
![]()
![]()
![]()
![]() 斯坦福ML(Matlab
斯坦福ML(Matlab )公开课,实现上次遗留的反向传播算法,并应用于手写数字识别,这次的看点是隐藏层的可视化,以及随机初始化参数的一些讲究。
简介
神经网络
上次实现了前向传播,但模型参数是别人给的。这次实现学习参数反向传播算法。
前向传播和损失函数
定义损失函数为:

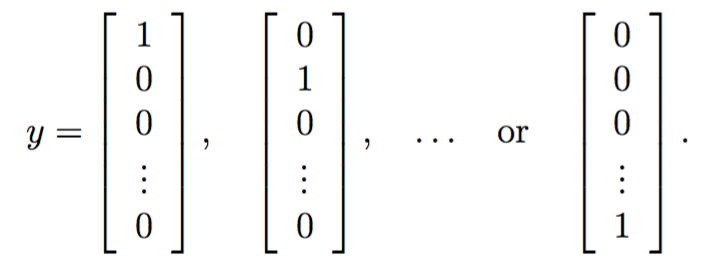
其中![]() 是输出层第k个神经元的激活函数,而y的编码为one-hot形式:
是输出层第k个神经元的激活函数,而y的编码为one-hot形式:

列向量第i个元素为1时表示编码为数字i。
正则化损失函数
定义正则化损失函数为

相较于非正则化的损失函数,其多出了两个正则化项,分别对应于输入层->中间层、中间层->输出层的权值参数。从求和符号可以看出这两个层的大小。
实现如下:
function [J grad] = nnCostFunction(nn_params, ...
                                   input_layer_size, ...
                                   hidden_layer_size, ...
                                   num_labels, ...
                                   X, y, lambda)
%NNCOSTFUNCTION Implements the neural network cost function for a two layer
%neural network which performs classification
%   [J grad] = NNCOSTFUNCTON(nn_params, hidden_layer_size, num_labels, ...
%   X, y, lambda) computes the cost and gradient of the neural network. The
%   parameters for the neural network are "unrolled" into the vector
%   nn_params and need to be converted back into the weight matrices.
%
%   The returned parameter grad should be a "unrolled" vector of the
%   partial derivatives of the neural network.
%

% Reshape nn_params back into the parameters Theta1 and Theta2, the weight matrices
% for our 2 layer neural network
Theta1 = reshape(nn_params(1:hidden_layer_size * (input_layer_size + 1)), ...
                 hidden_layer_size, (input_layer_size + 1));

Theta2 = reshape(nn_params((1 + (hidden_layer_size * (input_layer_size + 1))):end), ...
                 num_labels, (hidden_layer_size + 1));

% Setup some useful variables
m = size(X, 1);

% You need to return the following variables correctly
J = 0;
Theta1_grad = zeros(size(Theta1));
Theta2_grad = zeros(size(Theta2));

% ====================== YOUR CODE HERE ======================
% Instructions: You should complete the code by working through the
%               following parts.
%
% Part 1: Feedforward the neural network and return the cost in the
%         variable J. After implementing Part 1, you can verify that your
%         cost function computation is correct by verifying the cost
%         computed in ex4.m
%
a_1 = [ones(m, 1) X];%add +1 to X;
z_2 = sigmoid(a_1 * Theta1');
a_2 = [ones(m, 1) z_2];
a_3 = sigmoid(a_2 * Theta2');
Y = zeros(m,num_labels);
for i = 1 : m
    Y(i,y(i)) = 1;
end
%
J = 1 / m * trace(- Y * log(a_3)' - (1 - Y) * log(1 - a_3)');
t1 = Theta1(:,2:end);
t2 = Theta2(:,2:end);
regularize = lambda / 2 / m * (trace(t1 * t1') + trace(t2 * t2') );
J = J + regularize;
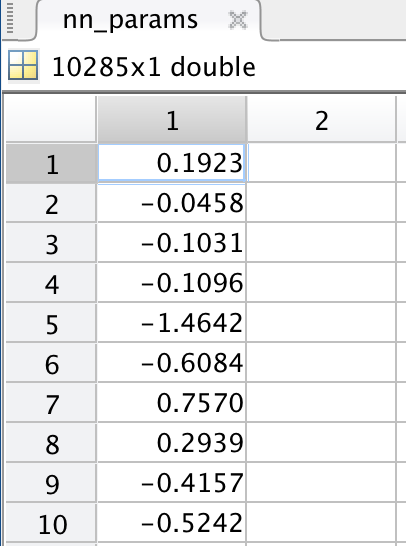
nn_params其实是个列向量:

包含了两个权值矩阵的全部元素(也许这么做是为了效率考虑),所以需要reshape还原成两个矩阵。
然后完成前向传播:
a_1 = [ones(m, 1) X];%add +1 to X;
z_2 = sigmoid(a_1 * Theta1');
a_2 = [ones(m, 1) z_2];
a_3 = sigmoid(a_2 * Theta2');
完成label的one-hot编码:
Y = zeros(m,num_labels);
for i = 1 : m
    Y(i,y(i)) = 1;
end
然后计算非正规化的部分:
J = 1 / m * trace(- Y * log(a_3)' - (1 - Y) * log(1 - a_3)');
这里的trace表示计算一个方阵的对角线元素之和。由于Y和a都是m*K的矩阵,所以括号里的结果是一个m*m的方阵,然而根据

求和方括号一共有m*K项。但是对y这个K*1的列向量来讲,只有一个元素是1,其他都是0,所以最终求和只有m项。究竟是方阵中哪m个元素呢?有效的只有i相等的元素,也就是对角线元素。其他元素都是无效的,是为了代码简洁而浪费的牺牲品。同样的牺牲品还有下面的
trace(t1 * t1')
明明只想计算t1元素的平方和的,为了优雅非要使用矩阵运算。
不得不说学术界永远视简洁优雅高于效率内存,好看至上。
sigmoid梯度
对激活函数![]() 求导:
求导:
![]()
实现如下:
function g = sigmoidGradient(z)
%SIGMOIDGRADIENT returns the gradient of the sigmoid function
%evaluated at z
%   g = SIGMOIDGRADIENT(z) computes the gradient of the sigmoid function
%   evaluated at z. This should work regardless if z is a matrix or a
%   vector. In particular, if z is a vector or matrix, you should return
%   the gradient for each element.

g = zeros(size(z));

% ====================== YOUR CODE HERE ======================
% Instructions: Compute the gradient of the sigmoid function evaluated at
%               each value of z (z can be a matrix, vector or scalar).

g = sigmoid(z) .* (1 - sigmoid(z));

% =============================================================
end
随机初始化参数
要将参数进行随机初始化,而不是全部置为0 。如果所有参数都用相同的值作为初始值,那么所有隐藏层单元最终会得到与输入值有关的、相同的函数(也就是说,对于所有 i,![]() 都会取相同的值,那么对于任何输入 x都会有
都会取相同的值,那么对于任何输入 x都会有![]() )。随机初始化的目的是使对称失效(symmetry breaking)。
)。随机初始化的目的是使对称失效(symmetry breaking)。
随机初始化可不是单纯地取随机数那么简单,里面大有学问。好的随机初始化算法可以加快训练速度,提高训练效果。其中一种经典的方法是,取一个常数![]() ,随机生成
,随机生成![]() 之间的均匀分布。
之间的均匀分布。
而常数![]() 的选取也有学问,经验法则是取
的选取也有学问,经验法则是取
![]()
上面的in和out分别代表某一层的入度和出度,可以看出,讲究的话每一层的![]() 都可能是不同的。
都可能是不同的。
反向传播
反向传播算法从输出层反向朝着输入层传播的是什么?是误差(包括斯坦福wiki在内的一些资料也译作残差)。
1、定义输入层的值![]() 为特征,利用前向传播计算每一层的输入和输出
为特征,利用前向传播计算每一层的输入和输出![]() 。注意输入层和隐藏层都必须设置一个+1偏置神经元。
。注意输入层和隐藏层都必须设置一个+1偏置神经元。
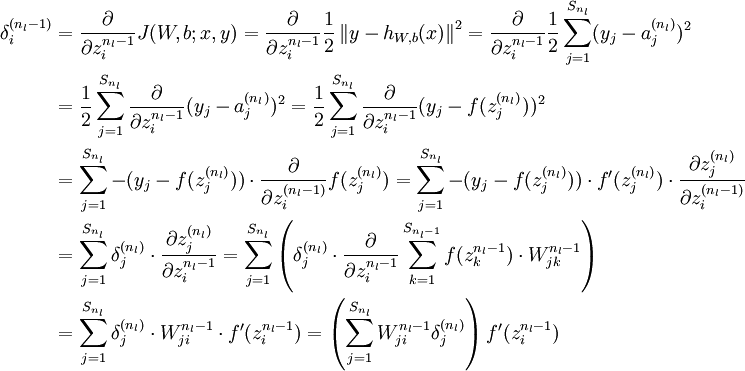
2、对输出层的每个神经元k,其误差是
![]()
其推导方式如下:

这里多了个f',是因为额外进行了一次“sigmoid激活”,而我们直接输出了z。
3、隐藏层反向传播公式
![]()
这个式子的推导如下:

将上式中的 与
与 的关系替换为l-1与l的关系,就可以得到:

以上逐次从后向前求导的过程即为“反向传播”的本意所在。
4、上式对参数求导,得到偏导数:

我们把偏置b也放进了W矩阵,所以上式等同于:
![]()
考虑到一共有m个训练实例,上式是其总体残差,平均残差为其1/m:

实现如下
% Part 2: Implement the backpropagation algorithm to compute the gradients
%         Theta1_grad and Theta2_grad. You should return the partial derivatives of
%         the cost function with respect to Theta1 and Theta2 in Theta1_grad and
%         Theta2_grad, respectively. After implementing Part 2, you can check
%         that your implementation is correct by running checkNNGradients
%
%         Note: The vector y passed into the function is a vector of labels
%               containing values from 1..K. You need to map this vector into a
%               binary vector of 1's and 0's to be used with the neural network
%               cost function.
%
%         Hint: We recommend implementing backpropagation using a for-loop
%               over the training examples if you are implementing it for the
%               first time.
%
delta_3 = a_3 - Y;
%delta_2 = delta_3 * Theta2;
%delta_2 = delta_2(:,2:end) .* sigmoidGradient(z_2);
delta_2 = delta_3 * Theta2 .* a_2 .* (1 - a_2);
delta_2 = delta_2(:,2:end);
Theta1_grad = delta_2' * a_1 / m;
Theta2_grad = delta_3' * a_2 / m;
推导很复杂,代码倒是很简单,不过寥寥数行。
校验梯度
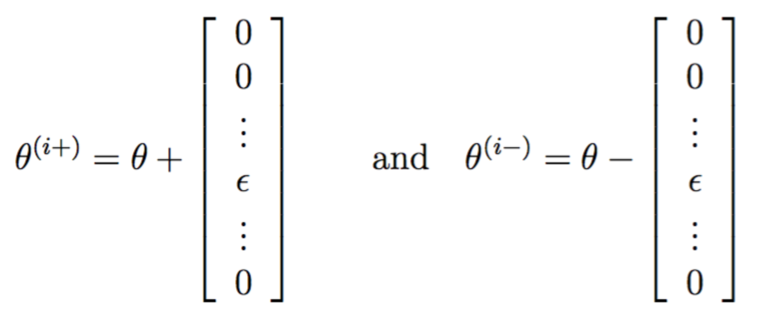
怎么知道代码到底有没有写错呢?把参数reshape到一个长长的向量中,每次只轻微改变其中一个元素,应该只有该元素对应的偏导数会轻微变化。
假设我们实现的梯度函数为![]() ,理想情况它应该输出
,理想情况它应该输出![]() 。定义
。定义

两者与theta相比都只有第i个元素有少量变化,如果![]() 真的没错的话,那么可以期待
真的没错的话,那么可以期待

实现如下,等式右边:
function numgrad = computeNumericalGradient(J, theta)
%COMPUTENUMERICALGRADIENT Computes the gradient using "finite differences"
%and gives us a numerical estimate of the gradient.
%   numgrad = COMPUTENUMERICALGRADIENT(J, theta) computes the numerical
%   gradient of the function J around theta. Calling y = J(theta) should
%   return the function value at theta.

% Notes: The following code implements numerical gradient checking, and
%        returns the numerical gradient.It sets numgrad(i) to (a numerical
%        approximation of) the partial derivative of J with respect to the
%        i-th input argument, evaluated at theta. (i.e., numgrad(i) should
%        be the (approximately) the partial derivative of J with respect
%        to theta(i).)
%

numgrad = zeros(size(theta));
perturb = zeros(size(theta));
e = 1e-4;
for p = 1:numel(theta)
    % Set perturbation vector
    perturb(p) = e;
    loss1 = J(theta - perturb);
    loss2 = J(theta + perturb);
    % Compute Numerical Gradient
    numgrad(p) = (loss2 - loss1) / (2*e);
    perturb(p) = 0;
end

end
正则化神经网络的梯度
在原梯度上加上正则化项的梯度即可,对于j=0代表bias,不做改动,否则:

这部分代码对应于:
% Part 3: Implement regularization with the cost function and gradients.
%
%         Hint: You can implement this around the code for
%               backpropagation. That is, you can compute the gradients for
%               the regularization separately and then add them to Theta1_grad
%               and Theta2_grad from Part 2.
%
t1 = [zeros(size(t1,1),1) t1] * lambda / m;
t2 = [zeros(size(t2,1),1) t2] * lambda / m;
Theta1_grad = Theta1_grad + t1;
Theta2_grad = Theta2_grad + t2;
使用fmincg学习参数
没什么可说的,fmincg在上次练习中也用过。
%% =================== Part 8: Training NN ===================
%  You have now implemented all the code necessary to train a neural
%  network. To train your neural network, we will now use "fmincg", which
%  is a function which works similarly to "fminunc". Recall that these
%  advanced optimizers are able to train our cost functions efficiently as
%  long as we provide them with the gradient computations.
%
fprintf('\nTraining Neural Network... \n')

%  After you have completed the assignment, change the MaxIter to a larger
%  value to see how more training helps.
options = optimset('MaxIter', 50);

%  You should also try different values of lambda
lambda = 1;

% Create "short hand" for the cost function to be minimized
costFunction = @(p) nnCostFunction(p, ...
                                   input_layer_size, ...
                                   hidden_layer_size, ...
                                   num_labels, X, y, lambda);

% Now, costFunction is a function that takes in only one argument (the
% neural network parameters)
[nn_params, cost] = fmincg(costFunction, initial_nn_params, options);

% Obtain Theta1 and Theta2 back from nn_params
Theta1 = reshape(nn_params(1:hidden_layer_size * (input_layer_size + 1)), ...
                 hidden_layer_size, (input_layer_size + 1));

Theta2 = reshape(nn_params((1 + (hidden_layer_size * (input_layer_size + 1))):end), ...
                 num_labels, (hidden_layer_size + 1));

fprintf('Program paused. Press enter to continue.\n');
pause;
可视化隐藏层
这是我最喜欢最期待的一部分,从来没见过这种玩法。
某个隐藏层神经元究竟在捕捉什么信息?这个问题等效于,什么样的输入x会使它激活(输出近似1,越大越好)。通过找到这样的x,然后将其可视化出来即可。由a=g(z),z=theta*x知,theta*x也要越大越好。事实上这个超平面是无限的,必须得有个约束,比如![]() 。据说加了约束后,取x=theta总能得到最大值(具体为什么还不知道)。
。据说加了约束后,取x=theta总能得到最大值(具体为什么还不知道)。
回忆下隐藏层的theta1每一行其实是一个401维的列向量,去掉bias项后为400维,代表一个20*20的图片,将这个图片显示出来即可。隐藏层一共25个节点,所以一共25张图片。
实现如下:
function [h, display_array] = displayData(X, example_width)
%DISPLAYDATA Display 2D data in a nice grid
%   [h, display_array] = DISPLAYDATA(X, example_width) displays 2D data
%   stored in X in a nice grid. It returns the figure handle h and the
%   displayed array if requested.

% Set example_width automatically if not passed in
if ~exist('example_width', 'var') || isempty(example_width)
    example_width = round(sqrt(size(X, 2)));
end

% Gray Image
colormap(gray);

% Compute rows, cols
[m n] = size(X);
example_height = (n / example_width);

% Compute number of items to display
display_rows = floor(sqrt(m));
display_cols = ceil(m / display_rows);

% Between images padding
pad = 1;

% Setup blank display
display_array = - ones(pad + display_rows * (example_height + pad), ...
                       pad + display_cols * (example_width + pad));

% Copy each example into a patch on the display array
curr_ex = 1;
for j = 1:display_rows
    for i = 1:display_cols
        if curr_ex > m,
            break;
        end
        % Copy the patch

        % Get the max value of the patch
        max_val = max(abs(X(curr_ex, :)));
        display_array(pad + (j - 1) * (example_height + pad) + (1:example_height), ...
                      pad + (i - 1) * (example_width + pad) + (1:example_width)) = ...
                        reshape(X(curr_ex, :), example_height, example_width) / max_val;
        curr_ex = curr_ex + 1;
    end
    if curr_ex > m,
        break;
    end
end

% Display Image
h = imagesc(display_array, [-1 1]);

% Do not show axis
axis image off

drawnow;

end
其实代码跟上次可视化手写数字图片的并没有多大不同,只不过传入的参数X变成了theta。
调用代码如下:
%% ================= Part 9: Visualize Weights =================
%  You can now "visualize" what the neural network is learning by
%  displaying the hidden units to see what features they are capturing in
%  the data.

fprintf('\nVisualizing Neural Network... \n')

displayData(Theta1(:, 2:end));

fprintf('\nProgram paused. Press enter to continue.\n');
pause;
输出:

的确多多少少可以看出每个节点在关注白色笔画的某种模式,而不关心图片边缘的像素。
利用同样的思路可以把输出层的权值可视化出来:
figure;
displayData(Theta2(:, 2:end));
得到

这10张图片对应着从1到0这10个数字,属于更抽象的表示,所以可视化其实意义不大,什么也看不出来。
Reference
http://www.hankcs.com/ml/back-propagation-neural-network.html
http://ufldl.stanford.edu/wiki/index.php/%E5%8F%8D%E5%90%91%E4%BC%A0%E5%AF%BC%E7%AE%97%E6%B3%95
 码农场
码农场
最后一步,有意思的是可视化两个权重矩阵的乘积 Theta2(:, 2:end)*Theta1(:, 2:end),会得到 10 个图像,可以看到隐隐约约有数字 0-9 的样子。
计算损失函数 J 的那一步,我的思路不是用矩阵乘法之后再用 trace 求对角线和,而是用 .* 运算符相乘再用两层 sum:J = (sum(sum(-Y .* log(a3))) – sum(sum((1-Y) .* log(1-a3)))) / m
这样可以减少很多多余的运算,而且可以跟公式对应上,更容易理解。